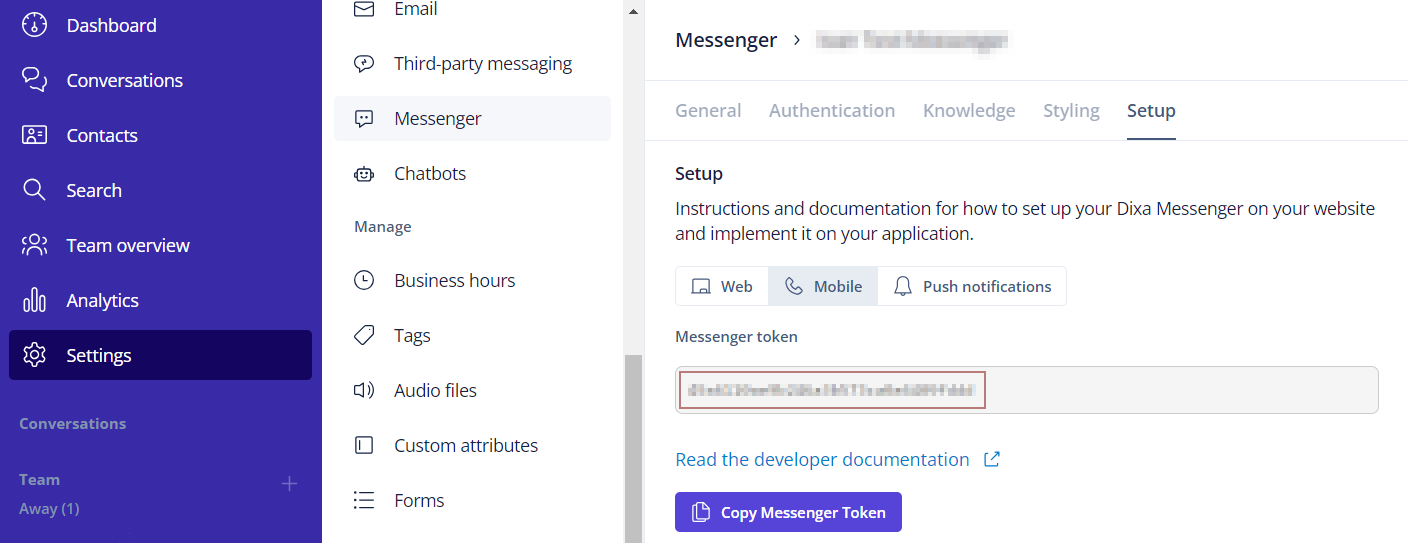
To integrate the Dixa Messenger into your Android application, begin by initializing the SDK within the onCreate() method of your Application subclass. This process involves creating a configuration instance with your API key, which can be found under Dixa > Settings > Messenger > Setup > Mobile in the Dixa Dashboard.
Example:
class ApplicationSubclass : Application() {

    override fun onCreate() {
        super.onCreate()

        // Create configuration
        val config = DixaMessenger.Configuration.Builder()
            .setApiKey("<YOUR_DIXA_MESSENGER_TOKEN>")
            .build()

        // Initialize DixaMessenger with the configuration
        DixaMessenger.init(config, this)
    }

}The Dixa Messenger Configuration can be generated using a Builder class. The Configuration allows for a tailored setup of the Dixa Messenger SDK to match your specific needs. Below is a comprehensive example showcasing various configuration options.
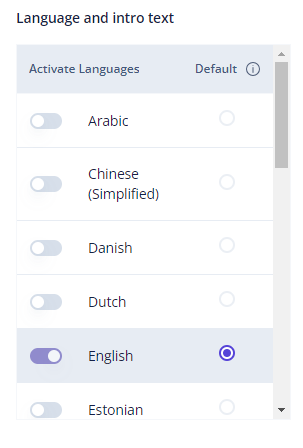
The Dixa Messenger SDK dynamically selects languages based on the configurations set in the Dixa Dashboard. By default, if no language preference is explicitly stated, the SDK will default to the device's locale if it matches one of the supported languages; otherwise, the default language will be chosen.
Available languages and the default language can be configured in the Dixa Dashboard under Settings -> Messenger -> General.
You have the option to explicitly define a language for the SDK to use. This is useful if you want to ensure a consistent user experience regardless of the device's locale settings. However, it is crucial to ensure that any language specified is also supported in the Dixa Dashboard settings; if not, the SDK will revert to the default language.
Example:
config.setPreferredLanguage("es") // Sets the preferred language to Spanish.💡 Language Specification: When setting languages for the Dixa Messenger SDK, use the two-letter language code conforming to the ISO 639-1 standard. This ensures the SDK accurately applies your specified language preferences.
⚠️ Important Note: Adjusting the language via the SDK will also modify the locale settings of the host application. This is because the SDK utilizes the Locale#setDefault(Locale) and the Configuration#setLocale(Locale) APIs to enforce language changes. Exercise caution, as this may affect the overall behavior and appearance of your application beyond the Dixa Messenger functionality.
The messenger SDK offers configurable logging levels to help you monitor its operation and troubleshoot issues. By default, the SDK is configured to suppress all logging output.
The SDK supports various log levels to tailor the verbosity of the logging output according to your needs:
LogLevel.NONE:Logging is completely disabled, and no log output will be generated.
LogLevel.ERROR:Only logs pertaining to critical errors will be printed, helping you identify and troubleshoot severe issues.
LogLevel.WARNING:Logs will include both non-critical errors and warnings. This level is useful for catching issues that may not be immediately critical but could potentially lead to errors.
LogLevel.ALL:Enables verbose logging, providing detailed output of all log messages. This level is ideal for in-depth debugging and development purposes.
Example:
config.setLogLevel(LogLevel.ALL)To filter and review logs generated by the SDK in your console, search for the DixaLog tag. This tag is used consistently across all log entries made by the SDK, facilitating easy identification and filtering of relevant log messages.
The Dixa Messenger SDK offers multiple authentication methods to suit different levels of user identity verification. Here's an overview of the available authentication options:
Anonymous
This is the default mode where the user interacts with the messenger without revealing their identity. No user-specific information is shared with the agent.
Claimed Authentication
Users provide a username and email to identify themselves. However, it's critical to understand that users can input any email and username, which may not accurately reflect their real identity. This method should be used with caution in situations requiring high security or precise identity verification.
Verified Authentication
This method utilizes a JSON Web Encryption (JWE) token signed with a private key configured in the Dixa Messenger Dashboard, offering a higher level of security and verifying the user's identity.
The Dixa Messenger Dashboard facilitates the customization of user authentication requirements, allowing you to set the minimum level of identity verification needed for users to interact through the messenger. This setting is crucial for maintaining the desired security and user verification standards within your application.
To adjust the minimum authentication level, navigate to the following path within the Dixa Dashboard: Dixa > Settings > Messenger > Setup > Authentication. Here, you can select the preferred level of authentication from the available options.

Anonymous identity
This is the most permissive level, where all users are allowed to initiate chats without any prior identification. It suits scenarios where user engagement is prioritized over identity verification.
Claimed identity
When the minimum identification level is set to claimed, consumers of the SDK must provide a name and email address to the Messenger SDK. If these details are not supplied through the SDK's Configuration, the SDK will prompt the user with a form to enter their credentials. This level is useful for interactions requiring a basic level of user identification.
Verified identity
The verified level requires users to authenticate with a verification token. This token must be provided to the Messenger SDK via the Configuration before a user can start a chat. This level is intended for scenarios demanding high security and verified user identities.
Anonymous identity
If neither claimed nor verified authentication is provided in the Configuration, the user will remain anonymous.
Claimed identity
When you want users to be identified by a username and email before they can start a chat, use the
setUserCredentialsmethod on your Configuration Builder. This method requires passing the user's name and email as parameters.build.setUserCredentials("user-name", "email")Verified identity
For situations that require a higher level of security, verifying the user's identity through a JSON Web Encryption (JWE) token is advisable. This can be accomplished by using the
setVerificationTokenmethod on your Configuration Builder, which takes the JWE token as its parameter.build.setVerificationToken("JWE-token")The JWE token needs to be encrypted using a Private Key that is configured in the Dixa Dashboard under
Dixa > Settings > Messenger > Setup > Authentication: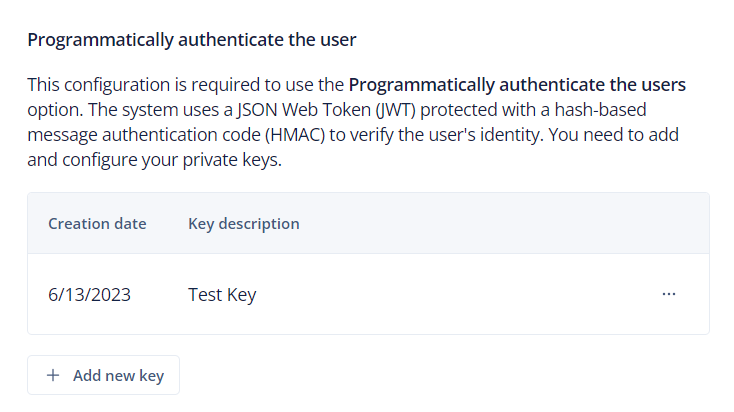
⚠️ Important Note: It is crucial to execute the user identification configuration code—whether for setting Claimed credentials or a Verification token—prior to initiating the chat session within your application. The effective behavior of the SDK during a chat initiation attempt directly correlates with the preset minimum identification level:
- If the level is set to Claimed and the necessary user credentials (username and email) are not pre-configured, the SDK will prompt the user with a form to collect this information.
- Conversely, if the level is set to Verified and a verification token has not been supplied beforehand, the user will be unable to start a chat.
To update the user's name and email associated with claimed identification, the DixaMessenger class provides the updateUserCredentials method. This method allows for the dynamic alteration of user credentials.
Example:
DixaMessenger.updateUserCredentials('user-name', 'email')⚠️ Updating user credentials is only possible before the Dixa Messenger has been started. Attempts to change the credentials after the Dixa Messenger is started will fail.
💡 Currently, direct modification of the verification (authentication) token is not supported. To update a user's verification status, you must first clear the existing token and then apply a new one using the appropriate method.
Clearing authentication data is straightforward and can be performed using specific methods in the DixaMessenger class. This action is irreversible and will also clear the user's conversation history, so it should be used with caution.
Claimed Identification Data
To clear data related to claimed identification, use the
clearUserCredentialsmethod.Example:
DixaMessenger.clearUserCredentials()Verified Identification Data
To remove a verification token and thereby revert to a lower level of authentication, utilize the
clearVerificationTokenmethod.Example:
DixaMessenger.clearUserCredentials()
⚠️ Clearing authentication data also clears the conversation history.
Once you've completed the configuration of the Dixa Messenger SDK in your application, you're ready to provide users with access to the Messenger interface. A common approach is to incorporate a dedicated button within your app's UI that, when tapped, triggers the opening of the Dixa Messenger.
You have two options for launching the Messenger:
This is the traditional method and is suitable when the Messenger should take over the entire screen.
The Dixa Messenger will be launched using the provided activity (via Activity#startActivity(Intent, Bundle)).
findViewById<Button>(R.id.buttonOpenMessenger).setOnClickListener {
    DixaMessenger.openMessenger(activity = this)
}This method displays the Messenger as a modal overlay, allowing you to leave space at the top of the screen for UI elements like status bars or legal notices.
The Dixa Messenger will be launched as a BottomSheetDialogFragment.
findViewById<Button>(R.id.buttonOpenMessenger).setOnClickListener {
    // Launch with a 100px offset from the top of the screen
    DixaMessenger.openMessengerSheet(activity = this, offsetPx = 100)
}
ℹ️ The
offsetPxparameter is optional and defaults to 0. You can adjust it to ensure the modal doesn’t obstruct specific UI components.
The Dixa Messenger SDK provides functionality that enables your application to display the number of unread messages. This feature is particularly useful for signaling to users that they have pending messages awaiting their attention.
To utilize this feature, the SDK exposes a method to set a listener for changes in the count of unread messages. Whenever there are unread messages, the listener is triggered, providing the exact count. You can use this count to update a notification badge, bubble, or any visual indicator within your application to inform the user.
Example:
DixaMessenger.setUnreadMessagesCountListener { amountOfUnreadMessages: Int ->
    // Implement logic to display the unread messages count to the user
    // For example, updating a notification badge or showing a bubble with the count
}Dixa Messenger enhances user engagement by sending push notifications for new messages when the app is not active. These notifications are powered by Firebase Cloud Messaging (FCM) on Android devices. To enable push notifications, the Dixa Messenger SDK must be provided with the device's FCM token.
Create a Firebase Project: Initiate by setting up a project for your application in the Firebase Console.
Configure Cloud Messaging: Navigate to
Project Overview -> Project Settings -> Cloud Messagingin the Firebase Console. Here, generate a new Cloud Messaging API (Legacy) key, which will be utilized for push notifications setup.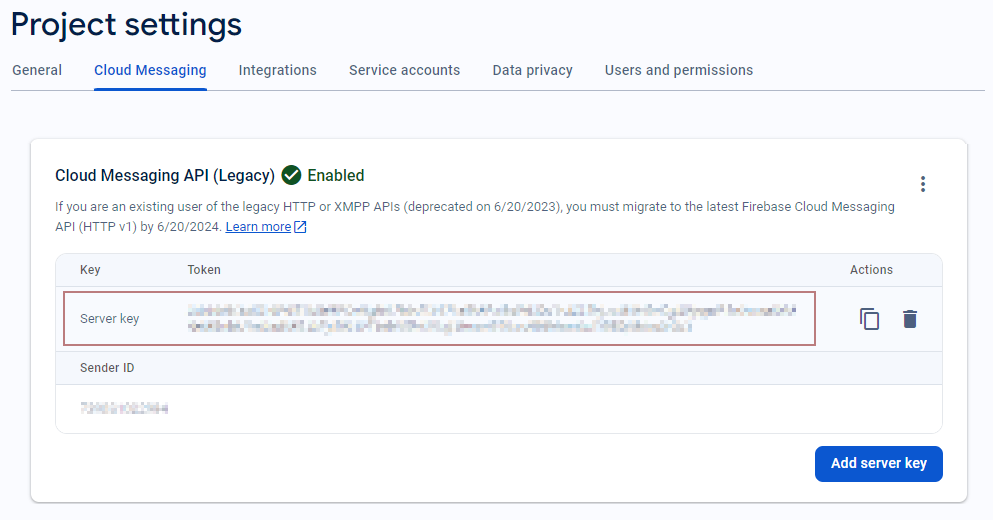
Dixa Dashboard Configuration: Access the Dixa Dashboard at
Settings -> Messenger -> Setup -> Push Notifications. Add aFirebase Cloud Messagingplatform entry and input the API key created in the previous step.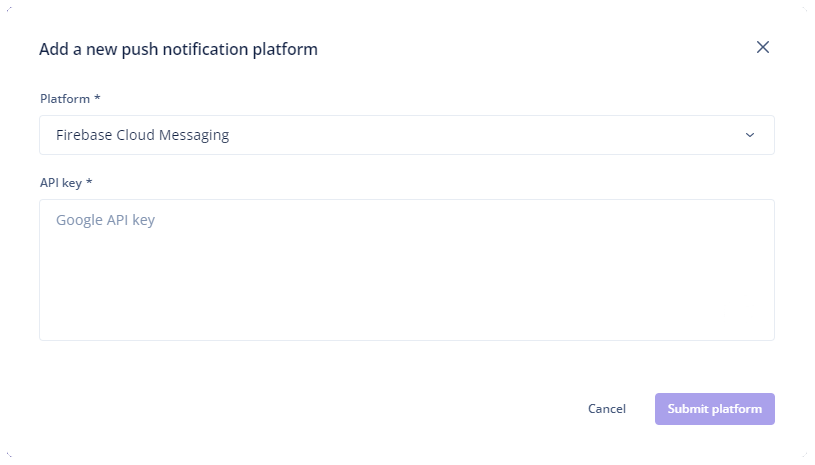
In your application, create a class that inherits from the
FirebaseMessagingServiceclass.Include the service in your application's manifest file:
    <service
        android:name="<app-package>.<firebase-service-subclass-name>"
        android:exported="false">
        <intent-filter>
            <action android:name="com.google.firebase.MESSAGING_EVENT" />
        </intent-filter>
    </service>
Replace
<app-package>with the package for your application and<firebase-service-subclass-name>with the name of the class you created in the previous step.
For Dixa Messenger to send push notifications to a device, it needs to be aware of the device's FCM token.
Example:
class FirebaseMessagingSubclassService : FirebaseMessagingService() {
    override fun onNewToken(token: String) {
        DixaMessenger.PushNotifications.registerNewToken(token)
        super.onNewToken(token)
    }
}To ensure that push notifications are correctly processed, notify the Dixa Messenger SDK about incoming messages. The SDK intelligently identifies messages related to Dixa Messenger; irrelevant messages are disregarded, while relevant ones trigger a user notification.
Example:
class FirebaseMessagingSubclassService : FirebaseMessagingService() {
    override fun onMessageReceived(remoteMessage: RemoteMessage) {
        super.onMessageReceived(remoteMessage)
        DixaMessenger.PushNotifications.processNewMessage(remoteMessage)
    }
}